Incubating the eggs
We knew nothing about hatching eggs, apart from having read the stories and articles that came up in the press and news streams about people hatching hen and quail eggs they brought from the supermarket.
I would say at this point if you don't have the time and want to wholeheartedly commit yourselves to the care and welfare of ducklings for the next 12 or 13 weeks - DON'T DO IT. Though we found it a very worthwhile, uplifting and enjoyable experience during the Coronavirus pandemic while in the UK's second lockdown it is not something for the faint hearted.
Another caution is needed for those who are very garden proud, ducks can make a real mess of your garden as they eat some of your prized blooms and quite happy to dig around in borders looking for tasty snacks (they are very good at eating slugs and snails, and we noticed later on in the summer that the grass areas they lived on, or we washed down their 'mess' onto grew very green and taller then other areas). Pond owners should also be aware that though they may solve your duck weed and alge problems they can devestate and denude your pond off aquatic plants, tadpoles, frogs and small fish as well as terrorise the larger ones.
Saying that, given the same circumstances we would do it all again.
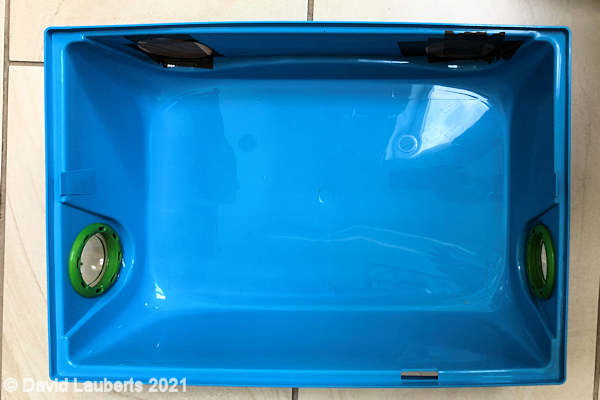
Hamster cage bottom
Pieces of equipment
Friend Google came to our aid (where would anybody now be without it), for sorting out suitable incubator materials and knowledge. Our first trawl found that containers, lights, thermometers, and shredded paper were required. We then found that they suggest you try and control humidity in the incubator.
I am a bit of a hoarder, some things going back 40 odd years, hoping they will come in useful one day. That day, and some subsequent ones, were some of those days a hoarder relishes to prove it was all worth it (who, and the need, to proving it to is another matter).
First out came the kids (our children are 30 plus years old now) old hamster cages to see what could be used for an egg container; one immediately seemed the right sort of thing with a bit of adaptation to try and retain heat.
Next was to dive into the ‘electrical things’ hoard to look for old incandescent or halogen lightbulbs, matching bulb holders, insulation tape and electrical wire. Old aquarium thermometers were pressed into use and the recently shredded personal documents that had not gone into the recycling were rescued together with some tin foil and packing tape. A portable electric drill, 3mm drill bit and associated small nuts, bolts and washers completed this kit.
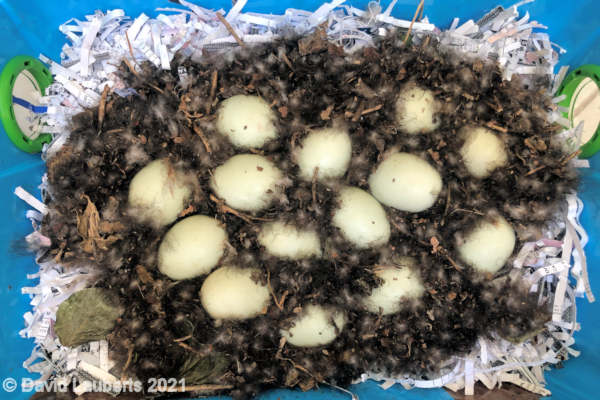
Eggs in place for the first time
As for humidity, I had a gadget I bought to look at humidity when I was varnishing things in one of the sheds, that joined the heap together with some plastic picnic cups to hold water in the egg container. A final addition was an old pastry brush to dab water onto the eggs.
Putting them together
The plastic cage bottom seemed ideal for the purpose. There were a couple of holes in the side, used for hamster running tubes, which were easily blocked off with packing tape (both inside and out so that there was no ‘sticky side’ showing anywhere). In went a layer of shredded paper and then some of Jemima’s down from her nest to place the eggs onto.
The upper part of the cage was more challenging, it was part clear plastic with two metal cage swing doors. We covered the doors with tin foil to try and keep any heat in (we first tried paper but that didn’t work so well). The foil also allowed me to put various wires into the foil of the cage door quite easily.
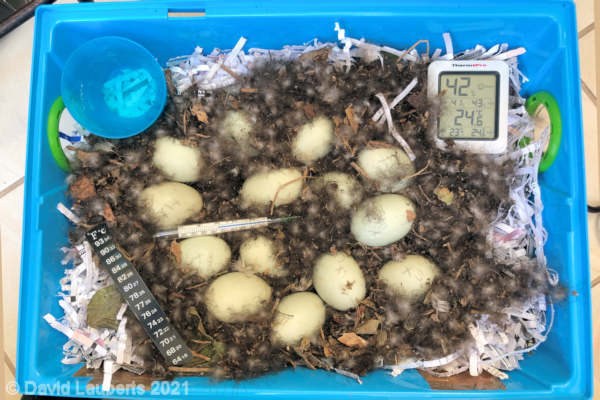
Adding the kit for the first time
Fixing the ‘heat lamp’ (incandescent light bulb) in place was a bit more challenging, the container was too small to have it vertical and have enough room round it to have the surface of the eggs at the right temperature, trying to fix it horizontally started to melt the plastic of the container top. To get round this I fixed a ceramic light fitting to the plastic roof, the round part of the glass bulb fitted nicely into this sideways on, I also put some tinfoil between the bulb and the ceramic fitting to try and reflect more heat down wards on to the eggs.
We had various lights of different wattages; in the end a 25 W bulb (used to be a decorative light in an electric fire) did the job best though it was very tricky getting all the eggs around in a circle at about 99- 100 degrees Fahrenheit (37 – 38 degrees Celsius) that was recommended. We had to play around with this, moving the eggs in and out with the thermometer on the eggs (using some plastic covered wire cable ties wrapped round the thermometer to help stabilise it on the eggs).
Another addition was a cooling fan, a lot of what we read seemed to say it would be good to have. I had an old laptop computer that I quickly dismantled and removed its chip cooling fan, it said 5V on its casing, and as luck would have it in the electrical hoard there was an old 240 v / 5V adapter (I think it was a kids game console one) that when connected made the thing go round.
The last item was the bird box camera that had been looking at Jemima's nest, not only to look at the eggs but also keep an eye remotely on temperature and humidity as well.
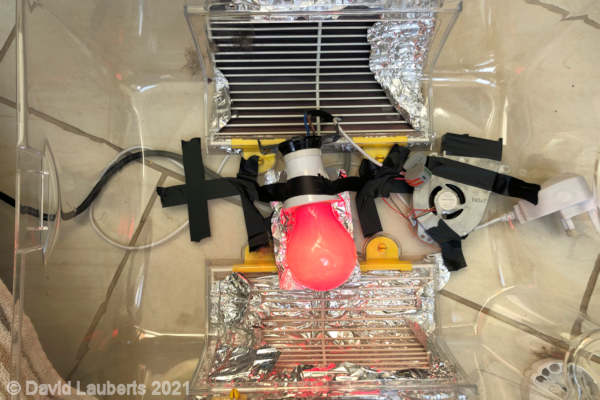
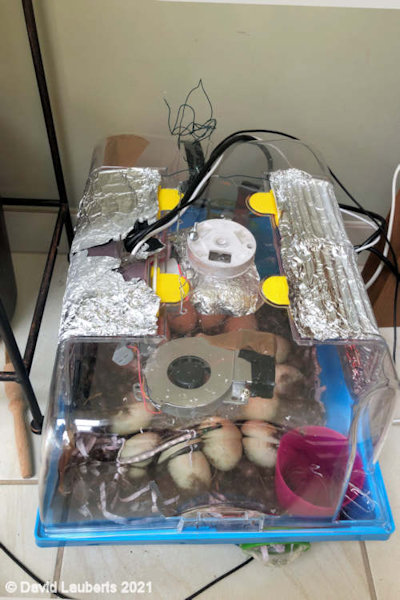
The gubbins in the roof
I tried insulation tape to hold bits and pieces together in the cage top but this did not really work well. I ended up drilling holes and using wire / small nuts and bolts to suspend fans, cameras and cables.
The fan turned out not to be required most of the time. It was too good at cooling things down and we really only used it on a couple of occasions when the temp started to rise too much during the day (there was no thermostat control, just my eyes on the thermometer and connecting/disconnecting the fan wires by hand).
Incubation
When we first placed the eggs, we marked them with a number and an 'X' so we knew which one was which and what side was what for turning purposes. Following the advice we found online we turned each egg over 4 times a day (about every 6/7 hours). The 'X' marks were great for this purpose. We also moved the eggs about the circle under the lamp every couple of days, the numbers came in very useful here, as we were still not quite sure how efficient the heating lamp was and thought moving them around was the best way to try and share out any cold/ hot spots.
We kept our home made incubator in a corner on the floor out of the sun in our garden room, it had the most consistent temperature (minimum 21 degrees C) and under floor heating, though it did tend to heat up a few degrees more during the day when the sun was up if we didn't open the doors and Velux windows.
Incubator in place 21st April 2021
Humidity was an issue. If you read stuff online it recommends 65%. We never achieved that consistently no matter how many water pots we put in the container. Though it sometimes got up there it was mainly around 55%, though it dropped once you opened the lid. Wild mallards don't have the luxury of the humidity meter, I suppose their natural nesting habits, going out for 'feather wetting sessions' a couple of times a day get it to where it needs to be naturally. A tip we did read was to use a pastry brush to brush water on the eggs when you turned them. (I hasten to say old; we used our actual pastry brush and brought a new one via good old Amazon Prime). Not getting enough water apparently hardens the shells and shrinks the egg membranes round the chick making it difficult if not impossible to hatch.
The temperature we seem to have managed quite well with the eggs in a circle round the heating bulb, moving them around regularly. It went up and down a little but using the fan to cool a little and a couple of old towels to put over the container when the temperature started to drop a little kept it between 96 and 102 degrees F, we aired for keeping it cooler rather than hotter than recommended, based on being too hot would do more harm than being too cold. Not being able to go out because of 'lockdown' meant we could keep an eye on things and do the necessary turning/ wetting.
Once things were set up properly (it took a couple of days) we got into a routine of doing things and starting to count down the days to the next stage. This was three days (21st April) before we expected them to start hatching, on the 24th of April (28 days after Jemima had started incubating, 10 days after we started). At this point the online references told us to stop turning the eggs. We continued to wet the eggs with a pastry brush several times a day. We didn't try any of the methods the articles suggested about looking how your eggs were progressing (shining lights through the eggs etc), things would only be what they would be.
First pip 5:36am 23rd April 2021"
As the 24th of April drew closer we started to become quite anxious with how successful this may all be. Firstly, due to Jemima's own consistentl periods off the nest, and then our own hastily cobbled together 'Heath Robinson' incubation machine and mothering efforts.
On the morning of the 23rd of April while wetting the eggs I noticed something on one of the eggs - our first 'pip' mark. A pip is a crack in the shell made by the chick from the inside, as it first bursts through the inner membrane into the air sac and then carries on and cracks the shell from the inside to create the pip mark /crack.
Looking back at the video recordings the crack appeared at 5:36am.
Things were starting to get exciting!
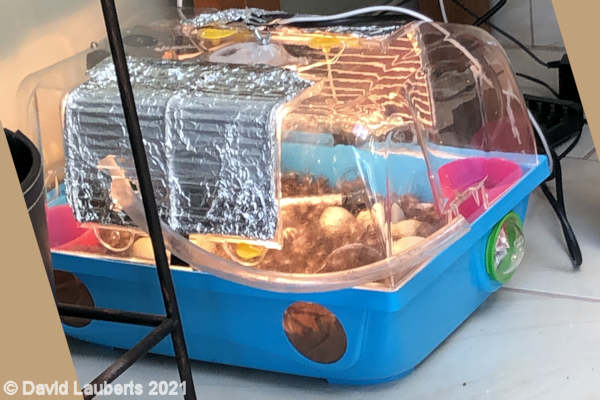
Incubator in place 21st April 2021
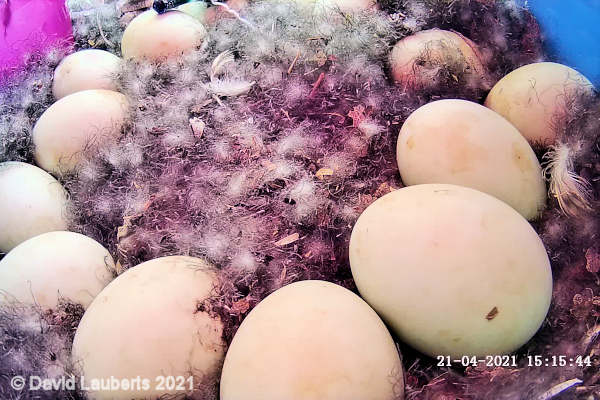
Eggs in circle 21st April 2021
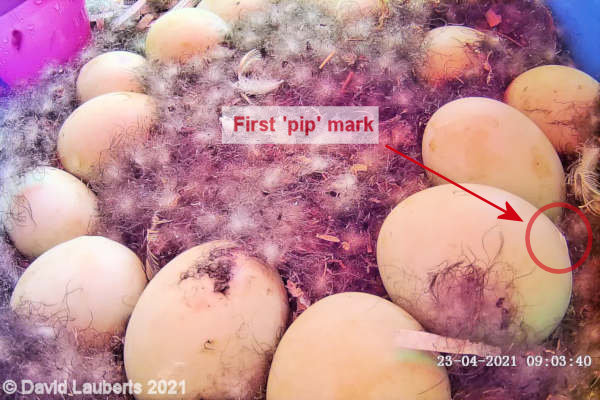
First 'pip' mark 23rd April 2021
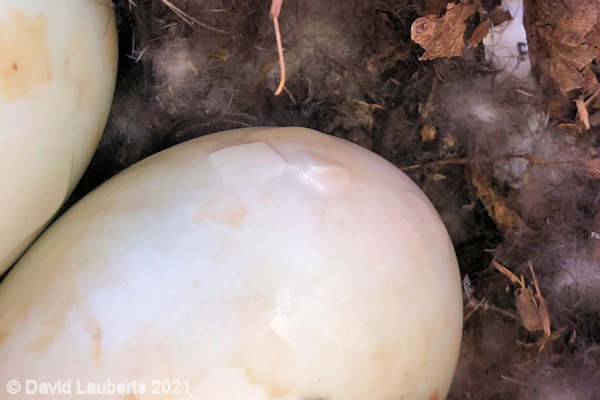
First 'pip' mark 23rd April 2021
Postscript
As I write this in July 2021 I must tell all hoarders to actually know what they are hoarding! We were just clearing out the contents of a shed we had come by from someone else about 4 years ago and had not touched till yesterday. Guess what - we came across a purpose built 25w egg incubator that still worked so we actually had one all along. It was good fun and quite exciting building our own though.